Wednesday, February 26, 2014

Cannoli Cups & My Blog's 4th Anniversary!


Wow, I can’t believe it’s been 4 glorious years since I’ve started blogging! By God’s grace, I’ve been able to make great friends through my blog. I don’t know what I was thinking when I first registered my blog! I thought of sharing all the short cut Indian dishes that I prepare almost every day in my kitchen. That was put on the shelf and in these 4 years, I’ve blogged about so many different recipes. This blog has become my cookbook, a documentation of my recipes that I can go back to and make again and again if I forget the steps. And on my journey, I’ve conjured quite a few lifes! Believe me, I’ve got all those emails.
This occasion calls for a special celebration, right? So let’s celebrate my blog’s 4th birthday with these easy to make Cannoli cups. You can make cups using pie dough or phyllo. I’ve used store bought cups just to make my busy life easier. No crime in it, okay. One should take advantage of every help one could get from anywhere if that one is as busy as I am. So, choice is yours. Either make your cups or buy them pre-made.
Here’s how I made it.


Cannoli Cups
Ingredients
2 packs of pre-made phyllo cups(available in freezer section of super markets)
1 cup homemade mascarpone cheese(didn’t I tell you I will make and use this cheese often?)
2 tbsp milk
1 tsp cinnamon powder
Mini chocolate chips

How to:
Mix cheese, milk and cinnamon powder with hand blender on medium speed.
Place the mixture in a piping bag.
Pipe the mixture onto the cups.
Garnish with mini chocolate chips and serve immediately.
You can make this mixture a couple days ahead and refrigerate it until you are ready to use.
Enjoy!

Saturday, February 22, 2014

Khaman


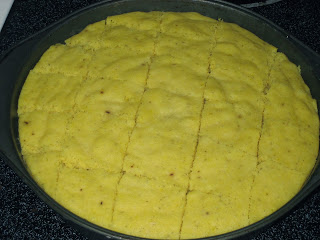
Now this is authentic Gujarati Khaman. We call this dish “vaati daal naa khaman” because this used the ground split chickpeas.  This is a long process just like making Idlis and dosas from scratch. You make Nylon khaman right away using besan. Anything nylon is not authentic and instant!  Just like the fabric itself. But this khaman dish takes time and effort to make and thus, tastes so much more better than the Nylon Khaman.  Frankly, I hadn’t made this khaman in a long time, maybe 3 years or so. Everytime we feel like having khaman, I would go for besan and make nylons.  I happen to have  4 lbs. of split chickpea bag that I bought over Christmas period last year.  I thought, let’s make khaman this time, the proper way. And I am glad I did. They came out so good, I can’t even describe that taste in words.  I also gave some to my Marathi co worker and she now absolutely is in favor if this khaman over nylon khaman.

Here’s how I made it.

Khaman
Ingredients
1 cup split chickpea, soaked overnight
Salt to taste
Pepper to taste
A pinch of turmeric powder
½ tsp citic acid
1 tsp Eno fruit salt
Water as required

How to:
Grind the soaked chick peas with salt in a blender to smooth consistency, adding just enough water to run the blender smoothly.
Adjust the water quantity. It should be thicker, just like idli batter.
Leave it overnight in a warm place to ferment.
Heat up a big sauce pot with water in it.
Boil the water.
Grease a deep pan(I used 8” cake pan) with oil and set aside.
In the meantime, add citric acid, pepper and turmeric to the fermented batter.
Once the water boils, then only sprinkle Eno on top of the batter. You will see lots of bubbles instantly forming up on the top layer.
Now gently fold the batter to incorporate the Eno.
Pour in the greased plate, steam it for about 15 minutes.
In the meantime, prepare tempering.
Once cool down, cut into pieces and pour over prepared tempering.
Enjoy!

Ingredients for tempering:
3 tbsp oil
1 tsp mustart seeds
Pinch of Asofoetida
Green chillies and cilantro leaves and shredded, fresh coconut for garnish(Optional)

Heat up the oil, add mustard seeds.
Once the seeds crackled, add asofoetida, green chilles(chopped) and pour over the prepared khaman.

Saturday, February 15, 2014

Infused Khaman!


Khaman is a Gujarati snack which is very popular all over the world! I can say this because there are Gujaratis all over the world and I can say that there is no Gujarati household in this world who wouldn’t make this snack and enjoy. Wherever the Gujaratis have gone, they have taken garba(traditional Gujarati dance), khaman, dhokla and the like with them. I too am part of that tradition and culture. People think since I am a Gujarati Christian,  I might not be into making all these traditional Gujarati dishes but that’s wrong. Every week, I make sure I make something that reminds us of our roots and that gives us a chance to talk to our son as well about Gujarat and India.

I call this dish infused because it is infused with sugar and lemon concotion. I remember my neighbour in Gujarat, used to mix yogurt with sugar and lemon and pour over the khaman and send to us the entire platter to enjoy! I made it once here and hubby didn’t like the yogurt on top so I don’t use it anymore.

Here’s how I made it.

Infused Khaman
Ingredients
For khaman:
1 cup chick pea flour(besan)
2 tbsp semolina(sooji)
1 tsp salt
1 tsp Eno(fruit salt)
1 tbsp sugar
Pinch of turmeric powder
½ tsp citric acid
¾ cup water
2 tbsp oil

For tempering:
3-4 tbsp oil
1 tsp mustard seeds
1-2 serrano chillies, chopped
A handful of fresh cilantro leaves
½ tsp asofoetida
1 tbsp sesame seeds and grated fresh coconut for garnish

For infusion:
1 tbsp sugar
2 tbsp fresh lemon juice
1 tbsp water
Mix it well and keep aside.

How to:
For khaman:
Bring water to boil in a large sauce pot.
Grease a tray(8 “ wide) with oil. Set aside.
Mix all the khaman ingredients, except Eno to smooth batter.
Once the water starts boiling, sprinkle the Eno on top of the batter.
You will see a whole lotta bubbles.
Mix gently for about a minute.
Immediately pour the batter into the greased tray.
Place the tray in the pot and steam it covered for about 15 minutes.
In the meantime, prepare tempering.
Heat oil in a small pot.
Add mustard seeds, let them crackle.
Then add asofoetida, chillies.
Now take it off the heat, add infusion and set aside.
Once khaman is done, cut them into squares.
Spoon the infused tempering, taking care to push it through each nook and cranny of the dish.
Take it out on a plate, garnish and serve.
Enjoy!

Sunday, February 9, 2014

BBQ Chicken Pizza


Over summer, I always grill about 3-4 lbs of chicken breasts, cut them in the strips and store them in freezer safe bags. They are ready for wraps or fajitas. One less thing for me to worry about. Come home, pull out the bag, in the morning, assemble wraps and lunch is ready to go.

This time around, I used the same grilled chicken strips for pizza. I wanted to make bbq pizza for a long time now and didn’t get to it. Finally over the weekend, I just threw in some peppers and onions and saute them with chicken. Quickly made pizza dough and we had a satisfying supper with lots of greens on the side ready for us.

Here’s how I made it.


Bbq chicken pizza
Ingredients
½ lb grilled chicken breast strips(salt and pepper the chicken breast and grill it till it cooks. Cut into strips)
1 medium onion, julienned
1 each medium red and green pepper, sliced
1 cup marinara sauce
½ cup bbq sauce
About 2 cups shredded mozzarella cheese

Basic Pizza Dough
1 pkg. dry yeast
3/4 c. warm water
1/4 tsp. salt
1 T. oil
1 tsp. sugar
3 c. flour

Mix ingredients together, adding flour last. Cover and let rise 1 hr.


How to:
Pre heat oven to 450° F.
Roll the pizza dough into 12 “ circle.
Place it on a greased pizza pan.
Spread marinara sauce(or your favourite pizza sauce) on top of the rolled dough.
Scattered chicken, peppers and onions on top.
At this point, I like to sprinkle some garlic powder on top of the chicken and veggies as well.
Now sprinkle liberally with cheese.
Finally, drizzle with bbq sauce and stick the pan in the oven.
Bake till about 20 minutes, or the bottom is nicely golden brown and cheese is melted.
Pull it out of the oven.
Cut into slices and serve.
Enjoy!

Saturday, February 1, 2014

Roasted Red Pepper Dip


I am not a fan of dips to tell you the truth. I don’t need dips for my veggie stix or my chips. I can enjoy my veggies and chips just like that. But with my family, it’s a different story. To make them eat vegetables, I either have to have the dip or make the dip out of the vegetables. This dip was just that. a necessity! I normally deep fried the pita chips for them to enjoy. This time around, I baked them and I knew that unless I’d make something tempting, lip smacking good, these baked chips are difficult to sell! I always keep a jar of roasted red peppers in my fridge. I like to use them for sandwiches and wraps. So I used them this time for this dip. And yes, you guessed it right. Baked chips were gone as if they were deep fried. I also like to use this dip as a spread for the sandwiches. That time, I don’t thin it out as much.

Here’s how I made it.

Roasted Red Pepper Dip
Ingredients
1 medium red pepper, seeded
Oil to spray the pepper with
Salt and pepper per taste
1 cup greek yogurt

How to:
Spray the pepper with oil and stick it into the hot toaster oven for about 20 minutes or until it’s charred. You can do this on the bbq as well.
Place the roasted pepper in a plastic bag for a couple of minutes. This will steam the pepper and make it easier to peel.
Once cool enough to handle, peel the pepper, place in a blender.
Add ½ cup greek yogurt or sour cream to it and blend to smooth.
Take it out in a bowl, adjust the consistency by adding more yogurt or sour cream.
Add salt and pepper to taste.
Enjoy!