Saturday, September 28, 2013

Grilled Chicken and Vegetables


 I wanted to go Mediterranean with this grilling. So I chose chicken, peppers, potatoes and feta. Of course with lots of Greek Oregano.  The beauty of Mediterranean cuisine is that it is very simple and yet very very delicious. You don’t have to labour over the hot stove for hours, no need to gather lots of spices and herbs. Just a few simple ingredients, a few simple steps and voila, dinner is served!

Join me at my table today for this flavourful Mediterranean meal.

Here’s how I made it.

Grilled Chicken and Vegetables
Ingredients
1 lb. bonelss, skinless chicken breasts, cubed
2-3 tbsp freshly squeezed lemon juice
Salt and pepper to taste
¼ cup olive oil
2 tbsp oregano, crushed between your palms to release the flavour
1 each red, orange and yellow pepper, medium sized, cubed
3 russet potatoes, washed and thinly sliced


How to
Marinate peppers and potatoes separately using oil, salt,pepper and oregano for about an hour.
Marinate chicken as well. Overnight is the best.
Preheat the grill.
Skewer chicken or just leave the cubes as it is and grill chicken and peppers and potatoes until vegetables are tender and chicken is cooked through.
Arrange on a serving platter and garnish with chopped parsley(optional) and feta cheese crumbles and serve.
Enjoy!

Saturday, September 21, 2013

Macaroni N Cheese


Now I am talking, right?! This is a classic comfort food adored by all ages. Kids love plain mac n cheese. Adults go for more sophisticated version of mac n cheese with all kinds of add ins and toppings. Again, possibilities are endless for add-ins and toppings. This time around, I just kept it simple with a few slices of bacon as an add-in and bread crumbs for topping. No need of anything actually. Just keep it plain as the kids would eat and you will have a satisfying meal.

Here’s how I made it.

Macaroni N Cheese
Ingredients
2 cups cooked Macaroni (or any other small pasta)
1 cup milk
1 cup each shredded cheddar cheese, provolene cheese
¼ cup Parmesan cheese
2 tbsp flour
3-4 tbsp butter
Salt and pepper to taste
Garlic powder to taste
A few bacon slices, crumbled
1 cup Panko bread crumbs
1 tbsp Italian seasnonings
2 tbsp oil
 

How to:
Heat butter in a saute pan.
Add flour and cook for about 5 minutes on medium heat till raw smell is gone.
Add milk and bring to boil on medium heat.
Now add pasta, all the cheeses,bacon(if using), salt, pepper and garlic powder.
Mix thoroughly.
Transfer into a heat proof casserole.
Mix bread crumbs, oil and Italian seasonings.
Top pasta with moist bread crumbs.
Broil till topping is nice golden brown.
Serve.
Enjoy!

Saturday, September 14, 2013

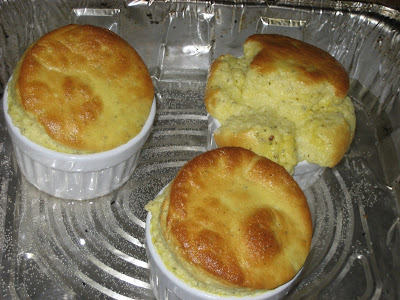
Breakfast Soufflé


 Now this is the easiets soufflé ever. Those lazy Saturday mornings, when you are cosy and comfortable in bed, don’t feel like getting out of it soon and still want to make an over the top breakfast for your family that everyone can love to come to table for, this is it!  Only a handful of ingredients thrown to gether and baked beautifully in a risen, warm goody, you would for sure rise to the occasion just as your soufflé. And the best part is this soufflé won’t fall down once out of the oven. It does hold the shape which is a delight to look at.

Now soufflé is lightly baked cake, with cream and egg yolks and beaten egg whites. We are omitting all those creams and little bit of flour and just stick with eggs and cheese. After all, it’s breakfast. Lunch will be on the cards so you don’t want to fill up right in the morning.

Here’s how I made it.

Breakfast soufflé
Ingredients
3 eggs, separated
4 oz. Philadelphia cream cheese
¼ cup grated cheddar cheese
Salt and pepper to taste
1 tsp onion powder


How to:
HEAT oven to 375ºF.
BEAT egg whites in medium bowl with mixer on high speed until stiff peaks form.
Beat cream cheese with salt, pepper and onion powder in a  large bowl with mixer until creamy.
Add egg yolks; beat until well blended.
Now add grated cheddar.
Gently stir in egg whites until well blended.
POUR into 3 ramekins sprayed with cooking spray.
BAKE 24 to 26 min. or until top is puffed and golden brown.
Do Not Open the Oven Door until fully fluffed or your soufflé will be crashed to the bottom of the ramekins!

The only downside of this soufflé is that it doesn’t reheat well. So you can’t make more and stash them in the refrigerator.

Enjoy!

Sunday, September 8, 2013

Milk Fudge(Milk Burfi)


I have never had a sweet tooth, to begin with. Growing up, I only like to have doodhpaak(Gujarati version of Kheer), koprapaak(coconut fudge) and gulab jamuns(need I say more about this dessert?!). And that too, occasionaly. After having moved to Canada upon my marriage, I had to start making desserts in my kitchen as hubby has a sweet tooth no one can beat. He has to have something sweet every day after dinner. And yes, he is a sucker for Indian mithais. Chocolates and cakes would only do when there is absolutely no mithai available in my fridge or pantry. So I began to experiment with the recipes for desserts about 18 years ago and now I can proudly say that I can make great mithais. I still stick to make mithais without or less ghee. That’s why I like to make mithais with milk and paneer. Gujarati mithais like magas, mohanthaal- require lots of ghee. So that is once a year kind of dessert.

In India, we normally get mawa burfi. Mawa(khoya) is abundunt in India. When I came to Canada about 20 years ago, there were only a handful of Indian grocery stores around. No mention of mawa. Nowadays, there is an Indian grocery store in every street corner or at least it seems like it, mawa is readily available but very very expensive. It takes time and effort to make mawa at home so I started using ricotta cheese for mithais. And the results were mind blowing. So even today, I stick to using ricotta cheese instead of mawa.

Milk Burfi(Milk Fudge)
Ingredients
1 container (400 gms.) Ricotta cheese(full fat)
Same container ful sugar
½ container ful milk powder
1 stick butter
Cardamom powder
Chopped almond and pistachionuts for garnish
 

How to:
In a microwave safe bowl, combine all the ingredients and cook on high heat for about 15 minutes, stirring occasionaly.
When the mixture is thick and moves around the spoon while stirring, it’s ready.
Pour in a non stick tray, sprinkle garnish.
Cut into pieces when cool down.
 Enjoy!

Sunday, September 1, 2013

Homemade Mascarpone Cheese


Move aside Tiramisu! Mascarpone is the best on the toasts!

For years, I’ve often restrained myself from buying this expensive cheese. Once in a blue moon when I would crave Tiramisu, I let myself go and grab a container of it. Or better, just grab a premade Tiramisu! It surely satisfies the craving. Now the scenario has changed. No more excuses of not making this exquisite cheese at home because it is insanely easy to make! Don’t believe me? Well you will once you see the recipe.  I looked up this recipe a couple of years ago and kind of laughed at it because I really didn’t think of making it at home.  I was talking to my sister and she said she made this at home. I said ok, when the heavy cream goes on sale, I will give it a try. To my surprise, it did on the very same weekend and I had no choice but to buy the damn thing! Well, I am glad I did. Because I am now in love with this recipe and will be making and using this wonderful creamy cheese not only for dessert, but for so many recipes that calls for cream cheese or ricotta cheese.

There is only one set method for making it. You can go nuts searching the web, you will only land on one recipe.

Here’s how I made it.

Homemade Mascarpone Cheese
Ingredients:
2 cups heavy cream(35%)
1 tbsp fresh lemon juice


How to:
I prefer to use the double boiler when I heat up the milk or cream just to preven it from scalding.
Boil 1 cup of water in a  large skillet.
Place the sauce pot in water, pour cream in it and heat up the cream up to 190° F.
You can directly heat up the cream on low heat until it reaches to 190° F.
If you don’t own a thermometer, don’t panic. Just heat up the cream until you see boiling  bubbles appear on the surface.
Now add the lemon juice. Don’t expect the curdling action like ricotta or paneer. This is heavy cream, it won’t curdle that much.
Keep on stirring.
Bring it back to 190°F temperature.
It is ready  when the cream will coat the back of the spoon in a thick layer.
Remove from heat.
Keep aside for about 20 minutes.
Now strain in cheese cloth.
Don’t squeeze.
Refrigerate for about 24 hours.
You will only get a tablespoon or so whey.
Your mascarpone is ready to use.
Go crazy with Tiramisu or use it the way I did!
Spread fresh cheese on toasted bagles or English muffins and top it off with powdered sugar and fresh fruit.
Enjoy!