Don't know what I was thinking when I made this dinner! I was having a pounding headache. And I went ahead and made chicken masala, aloo gobi and Methi gota! I took a little help with store-bought naans! My idea was to make parathas but I was too tired to make parathas. Hubby also asked me why I went through all the trouble when I had a headache! But then, it's me!
Chicken masala was very quick since I had some chicken tenders, marinated in the fridge in salt, pepper and lemon juice marinade. Nothing fancy. So I quickly browned onions, cook the traditional Indian masalas like cayenne, turmeric, cumin powders and ginger garlic paste with pureed tomatoes till the oil separates . Throw in the chicken tenders and let it cook slowly till the tenders are done.
On the 2nd burner, I just heated up the oil, added whatever seeds I saw( I guess they were mustard and cumin) first in the spice cabinet. Then threw in the chopped cauliflower and potatoes with a bit of traditional Indian spices again and let it cook till the potatoes are fork tender.
While these 2 dishes were cooking, I chopped methi, made the gota batter with besan, ginger, garlic, salt, whole peppercorns and of course, methi and water! And deep fried them!
I have some left over which I am going to use for Gatta kadhi tonight! It will go very well with Khichdi and okra fry! Hey, there it is, my tonight's dinner plan already laid out!
Friday, April 30, 2010
Monday, April 26, 2010
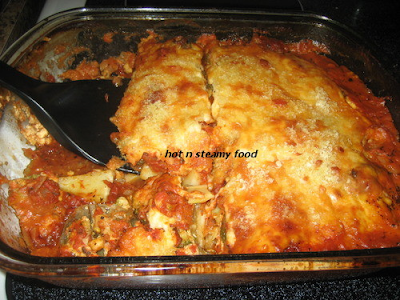
No Noodle Veggie Lasagna
I thought of this lasagna recipe last month when my hubby was fasting during the Lent and gave up the pasta. I wanted to make it during the Holy week but somehow didn't get a chance. Finally, last Wednesday, I finally got to give this recipe a try and boy, it was delicious! I only had russet potatoes and eggplants on hand and we are not big on zucchinis so this was the perfect way to have a low carb, no noodle lasagna.
I pan fried the potato and egg plant slices and steamed the broccoli a bit. Just to take the edge of it and to give the veggies a head start.
No Noodle Veggie Lasagna
I pan fried the potato and egg plant slices and steamed the broccoli a bit. Just to take the edge of it and to give the veggies a head start.
No Noodle Veggie Lasagna
Ingredients
1 lb large russet potatoes, peeled, sliced into 1/4" thick slices
1 lb egg plant, sliced as potatoes
2 cups broccoli florets, steamed
Salt and pepper to taste
1 tbsp Italian seasoning
1 tsp red pepper flakes
1 bottle marinara sauce
1 lb ricotta cheese
1 egg
2 cups pizza cheese blend
Oil
How to:
Pan fry the potato and egg plant slices. Salt and pepper them and keep aside. In a bowl, mix ricotta cheese and egg, keep aside. In 13X9" baking dish, pour half the bottle of marinara sauce. Lay potato and egg plant slices, overlapping each other on sauce. Spread ricotta cheese mix evenly. Layer steamed broccoli on cheese mix. Pour rest of the marinara sauce on broccoli and spread with cheese blend. Cover tightly with aluminum foil and bake at 425° oven for 40 minutes. Remove the foil wrap and bake for 15 more minutes till the cheese is nice golden brown and bubbly. Let stand for 10 minutes before serving. Bon appetite!
Thursday, April 22, 2010
Beef N Spinach Casserole
Wednesday night is usually pasta night in my house. Yesterday was no different. The only difference was " what kind of pasta dish I will make?" ! I wasn't sure at all what to make for dinner. The only thing I had on hand was sautéed onion and garlic and browned ground beef, so that part of dinner production was taken care of. Well, as I thought about it, one thing was sure that I would be using cream cheese and egg! So I asked Mark to take the cream cheese container and an egg out of the refrigerator and put them on the counter to come to the room temperature. He instantly knew that I'd be making pasta!
OK, I reached home, started the pot of water to boil anyways. Need that to cook pasta right?! Then I saw baby spinach and cheeses, looking at me, crying out to me, pick me, please! So the dinner was planned in my mind. Beef and spinach casserole, oozing with cheese! And you guess it right! The complements! Got 2 thumbs up! Now that's the part I love to get after a comforting home cooked food.
Beef N Spinach Casserole
Ingredients
1 lb. ground beef, browned and drained
1 big onion
3 cloves of garlic
3 cups packed fresh baby spinach
4 oz. cream cheese, at room temperature
1 egg, at room temperature
350 gms whole wheat pasta(I used fusili)
3 cups marble cheese, shredded
1 lb. ground beef, browned and drained
1 big onion
3 cloves of garlic
3 cups packed fresh baby spinach
4 oz. cream cheese, at room temperature
1 egg, at room temperature
350 gms whole wheat pasta(I used fusili)
3 cups marble cheese, shredded
How to:
Cook pasta according to the pacakge directions. Drain and reserve a cup of pasta water.
Sauté onion and garlic till onion is translucent. Add ground beef, spinach, beaten egg and cream cheese. Mix well. Now add cooked pasta to the beef mixture and slowly add the pasta water till you get creamy consistency. Put in a greased 13X9 baking dish and sprinkle lots of cheese on the top. Bake in 425° F oven till cheese is melted and is nice and bubbly. Let stand for 5 minutes before serving.
The beauty of this recipe is that you don't need to preheat the oven. And a healthy and delicious, almost one pot meal is ready for you to devour!
Tuesday, April 20, 2010
Melt in your mouth Khasta Kachoris
Easter long weekend was a blessing indeed. Lots of sunshine and warm temperatures creeping in through my window, birds chirping sweetly early in the morning, it is utterly a wonderful feeling. With a steamy cup of coffee, I was thinking it is time to make something spicy(not hot!) and mouth watering which would serve as a light but filling snack! It suddenly dawned on me that some sort of chaat is in order!
Growing up in India, believe it or not, I wasn't a fan of street chaat! The road side vendors in Ahmedabad, selling pani puris, ragda patties, pavbhaji,dalwadas and what not, dressed in the shabbiest of clothing and the sweat from their foreheads falling straight down in the pot of pani! Their hands, they scratch their heads with, would go right in the same pot of pani to make you tasty(!) chaat! Uh,uh, not a pretty picture! On top of it, people around them, with their mouths full of big puris and pani running down their chins, I was like, man, how can somebody stand this?!
Well, it was somewhat a different story when I came to Canada. I still am not fond of chaats. But hubby dear is! And as we all know, in North America, you were required to make your own chaat before the explosion of Indian population! These days, we have so many restaurants that serve only chaats to satisfy any palate, but still nothing is like homemade stuff. Over the years, I have experimented a lot and I have learned of ways to replicate different recipes. So here is one of multi tasker recipe! You can eat it as puris or as a chaat, smothered with spicy and tangy chutneys, yogurt and tons of other fixings, where each plate creates a whole new experience in your mouth. And you don't have to go out to any restaurant and splurge. You can have this in the comfort of your home.
Khasta Kachori(makes 16)
Ingredients:
1.5 cups of All purpose flour
3 tbsp ghee
1/4 cup water
Salt to taste
For filling:
1/2 cup besan
1 tsp cumin seeds
1 tsp fennel seedsgarlic-ginger paste
1 tsp chilli powder
1 tsp garam masala
1 tbsp amchur (dry mango powder)
1 tbsp oil
salt to taste
Other ingredients :Oil for deep frying
How to :
For the dough :Mix all the ingredients and make a firm dough by using a little water. Knead for at least 5 to 7 minutes. Divide the dough into 16 equal portion and keep it under a wet kitchen towel.
For the filling :Heat the oil in a pan, put the cumin seeds. When the seeds crackle, add the well drained moong dal and fry for a few seconds. Add the green chilli-ginger paste, fennel seeds, chilli powder, garam masala, besan, amchur and salt. Stir for 5-7 minutes till all the masalas are cooked properly. Cool and divide it into 16 equal parts. Shape each part into a ball and keep aside.
For Kachoris: Roll each part of the dough to a puri of 2" diameter. Put a tbsp of the filling mixture in the centre of the rolled puri. Cover the filling mixture with the dough by slowly stretching it over the filling mixture. Close the ends tightly by pinching them together. Roll each filled puris to upto 2½" diameter. Also make sure that the filling does not spill out. Lightly press the centre of the kachori with a thumb. Deep fry in a hot oil over a slow flame till they puff up and turns golden brown on both sides. Cool and keep aside.
To serve as chaat:
Keep one kachori on a plate and a crack a hole in the centre of it. Fill it with 3 to 4 tbsp of the beaten plain yogurt. I also added boiled whole moong to get some nutrition out of this! Drizzle the green chutney and tamarind chutney. Sprinkle chilli powder, jeera powder, salt and coriander on the top of the kachori.Sprinkle sev on top. Serve immediately.
Monday, April 19, 2010
Banana Nut Muffins
Mmmmmuffins! Sometimes sweet, sometimes savory! Truly versatile. You can have sweet muffins with your breakfast, savory muffins as lunch or snack or an appetizer! I tweaked, I twisted and finally came up with a "healthy" version of a classic banana nut muffin recipe!
The other day, I had 3-4 overripe bananas, sitting in my fruit basket! I have enough of those bananas in my freezer for my smoothies. So I definitely didn't want to dump them in the freezer this time. I thought about making muffins for Sunday breakfast but originally they would have been blueberry muffins. And thanks to those mushy bananas and a jarful of walnuts, I thought of making banana nut muffins instead. And the complements were: Restaurant quality muffins! Hmmmm, now that is something to treasure for life especially when it comes from the picky eaters in my family!
So, here is the recipe. Give it a try!
Banana Nut Muffins(makes 6 large or 12 medium muffins)
Ingredients:
1 cup whole wheat flour
1/2 cup all purpose flour
1 1/2 teaspoons baking powder
1/4 teaspoon baking soda
1/4 teaspoon salt
1/4 teaspoon ground cinnamon
1/4 teaspoon ground nutmeg
3 large ripe bananas, mashed well (about 1-1/2 cups)
2 large eggs,lightly beaten
1/3 cup sugar
1/3 cup buttermilk (no buttermilk? add equal parts of plain yogurt and water)
1/4 cup canola oil
1 teaspoon pure vanilla extract
1 cup coarsely chopped walnuts or pecans
Garnish: (Optional)
1/2 cup quick cooking oats (I love the crunch!)
How to:
Preheat oven to 400° F. Place the oven rack in the middle of the oven. Spray the muffin pan. In a large bowl, mix all the dry ingredients thoroughly, including walnuts. In another bowl, mix wet ingredients. With a spatula, lightly fold wet ingredients into dry ingredients. Do not over mix. Mixture should be lumpy. Spoon the batter into prepared muffin cups, sprinkle quick cooking oats on top of each muffin, bake for 20-25 minutes or until a toothpick inserted in the centre comes out clean. Place on a wire rack for 10 minutes to cool down. Slather with lots of healthy omega 3 margarine and enjoy!
These muffins keep for upto 4 days at room temperature, when sealed in air tight container.
Sunday, April 18, 2010
Puffs (Keema Pie)
Normally I don't make hearty meals on Sunday nights. Sunday lunches are on heavier side and also, we have coffee and snacks at 4 o'clock so there is not a possibility of a good sit-down Sunday dinner. I prefer to make sandwiches and/or soups. Well, saving you from all the rant, I did make a full dinner on Palm Sunday as we only had a light lunch and from Monday, my fasting was to begin. And we also refrain from eating meat during the Holy week.
I bought the puff pastry a long time ago just to make these puffs. Finally was able to pull them out of the freezer and put them to use. Speaking about puff pastry, I was watching this show on TV and they showed how they make the puff pastry. It was horrible! A lb. of all purpose flour and a lb. of unsalted butter! That is all it takes to make that nice, flaky, puffy pastries! Maybe next time, I will try to replicate the recipe at home, using lesser fat.
One can replace the meat with potato and peas mixture but hey, don't we have samosas for that?! Why use high fat puff pastry for something as simple as potatoes and peas?!
Meat puffs(makes 8)
Ingredients
Ingredients
1 lb. ground beef
1 large onion
Ground paste of ginger, garlic and green chilles, to taste
Salt, garam masala, red chilli powder, turmeric powder, cumin powder to taste
How to:
Pre heat the oven to 425° F.
Cook ground beef and onion till beef is no longer pink.
Add all the spices and let it cook till the mixture is dry.
Roll out the puff pastry sheet on a floured board into 2 - 13X9 rectangles.
Make 4 equal pieces out of each rectangle.
Fill up the pieces and fold over.
Pinch the seams so that the filling doesn't come out.
Place the folded pieces on a cookie sheet, and bake till they are nice and golden.
Enjoy with as many sides of veggies as you like or as a snack. I paired it with steamed broccoli and cheesy potato skins.
Friday, April 16, 2010
Khandvi
One of the most savored Gujarati snack is khandvi. So easy to prepare(!), and so delicious to eat! I still remember khandvi from Daas Khaman House! I used to work at the High Court of Gujarat @ Ahmedabad and right across from street, there was a branch of Daas Khaman! Bunch of friends used to get the take out lunch from there! Dad used to bring rolls of Patra (rolls of Ado leaves, stuffed with chick pea batter and steamed! Yum!) and khandvi from them on his way back home from work.
In Canada, when I came 16 years ago, there wasn't that many Gujaratis or Gujarati restaurants. And hubby dear loves khandvi so I got the recipe from a friend of mine and to my utter disappointment, the first attempt failed! I cooked the mixture for a longer period of time so it went lumpy on me! Well, 2nd try and the same result. I didn't give up and made another batch and voila! That came out perfect. And this time, I tracked time and the texture of the mixture being cooked! I have been following the same since last 15 years and getting exactly the same results always!
Khandvi(Chick Pea flour rolls, steamed)
Makes about a lb.
Ingredients
1 cup besan(chick pea flour)
1.5 cups buttermilk
1.5 cups water
a pinch asafoetida
1 cup besan(chick pea flour)
1.5 cups buttermilk
1.5 cups water
a pinch asafoetida
Salt to taste
Pinch of turmerric powder
for tempering: oil, mustard seeds, curry leaves, green chiles
for garnishing: cilantro
How to:
Grease back of the baking pans, you need almost 4 of them. Set them aside.
Mix the ingredients to a smooth paste. Cook on medium low heat for almost 20 minutes till the mixure becomes thick and the ribbons start to fall down from the spoon! The mixture will bubble less at the last stage of cooking. Check by spreading with a spatula on a back of a small plate. If it spreads smoothly, you are done. If not, cook for a couple more minutes. Now you need to work real fast! Equally divide the cooked mixture on cookie sheets and start spreading in thin layers. By the time you are done with the last cookie sheet, the batter will be cooled down. So now, start cutting strips and rolling them to make khandvis! Prepare the tempering and pour it over the rolls. Garnish with cilantro.
See, didn't I say it is "easy"?!
Wednesday, April 7, 2010
Light weight salad
By God's grace, I don't have any weight issues! Maybe 5 or so lbs to lose or should I say, get 5 lbs of muscle and lose the fat! At the same time I receive complements, I get the questions on how I stay slim! Well, first of all, thanks to my dad! Yes, it is in my genes. Secondly, I do watch what I put in my mouth! Yes girls, you need to do it. It is very important to really check what is on your plate. This doesn't mean you need to deprive yourself of the foods you love. But again, there is a certain constraint called "Portion Control"! I don't binge normally but I do crave certain foods that are definitely a no, no if you are watching your waistline. And it is true that a few seconds of joy on the lips, a permanent bulge on the hips! So I limit the quantity if I eat fried or fatty food and I replace my next meal with healthy salads. So for my friends, I decided to share a few recipes that is satisfying and filling and you can see how fast the weight come off!
Here is a salad that is one of my favorites. And you will see that salads shouldn't be boring or green!
Tomato and Avocado salad
Ingredients:
about 4 medium beets, scrubbed and tops removed
4 medium tomatoes, different colours or heirloom if possible, cut into 1/4-inch wedges
1 medium Haas avocado, ripe,cut into 1/2-inch cubes
1 small red onion, cut in half and sliced into thin half moons
4 tsp olive oil, extra-virgin
4 tsp red wine vinegar
1/4 tsp table salt
1/4 tsp black pepper, freshly ground
1 Tbsp basil, fresh, chopped
1 Tbsp chives, fresh, chopped
How to:
Pre heat oven at 400° F. Place beets in aluminum foil, cover loosely. Bake until beets pierce easily with the point of a sharp knife, about 25 minutes.
Remove beets from oven and let them cool down. Peel beets with a vegetable peeler and cut into 1/2-inch wedges; place beets in a large bowl.
Add tomato, avocado, onion, oil, vinegar, salt and pepper to bowl; toss to combine. Top mixture with basil and chives and serve.
Yields about 1 1/4 cups per serving.
Sunday, April 4, 2010
Saturday, April 3, 2010
Quick N Satisfying!
Good Friday was such a hectic day. In between morning and evening church services, I had planned to tackle a few chores around the house. Not to mention, to make a good, quick and filling supper as all three of us were fasting. And I know that Mark needs something more than regular Gujarati food for supper! So to please him, I decided to make puris. Hubby wanted to have khandvi for so long, I wanted to please him too! So here is the food, don't you think I killed 2 birds with one stone?! We had delicious supper which was equally healthy(minus the puris!). I made puris, khandvi, paneer bhurjee and gobi masala.
Paneer bhurjee is one of the easiest and quickest dish to make. Make paneer first, of course! Brown some onions, green chilis, garlic and ginger paste. Add mashed paneer and peas, with the usual spices like garam masala, turmeric and cumin powders and yes, salt and pepper, and you are done. I don't like to use red chili powder in this dish.
Gobi masala, another quick dish. I used the fried onion(store bought). Heat up the oil, add fried onions, cumin seeds, tomatoes. turmeric powder, coriander powder, red chili powder, paprika and cook for 3 minutes until nicely mixed. Add chopped cauliflower, potatoes and peas and cook till potatoes are done.
This is the beauty of day-to-day Indian cooking! No recipes, only method. You can adjust everything to your taste and you can have good results every single time.
Khandvi recipe will be in another post as this is Saturday morning and I need to run some more errands! Ciao!
Thursday, April 1, 2010
Subscribe to:
Posts (Atom)