Sunday, December 22, 2013

More tree Pancakes!


Trust me, I am not done yet! This is another version of the Christmas tree pancakes! And yes, you are not allowed to say enough already! Yet another idea popped in my mind and you will see the post next weekend! That will only change if my family is tired of having pancakes every Sunday morning!
This Christmas tree is a very easy to make. Involve your kids to make it and they will have a blast in the kitchen. Again, all the ingredients stay the same as past 2 weeks’ pancakes. Just alter the method. Place the pancake batter in a bottle( honey bottle works great) and drizzle the pancake batter on the hot skillet to make the tree shapes. You can omit the food coloring if you want to. Just make regular pancakes and garnish it with edible Christmas confetti.
Enjoy!

Sunday, December 15, 2013

Oh Christmas Tree Pancakes!


Told ya last week, asking you all to stay tuned for this one! Since Christmas almost here, hence the title of this post! Again, nothing’s changed in ingredients. 


HAVE A VERY MERRY AND BLESSED CHRISTMAS. MAY GOD BLESS YOU ALL!

Sunday, December 8, 2013

Christmas Tree Pancakes Again!


This is another extension to the tree pancakes from last weekend. Real Christmas tree shaped pancakes this time. All the ingredients remain the same. Just use a tree shaped cookie cutter and pour ¼ cup batter inside of it and cook the cakes.

 
Or you can make pancakes as usual and use the tree cookie cutter to cut out the shape of the trees.
Decorate your mini edible Christmas trees whatever way  you like and devour!
Enjoy!

Sunday, December 1, 2013

Tree Shaped Pancakes

Let it snow! Let it snow! Let it snow! Well, there it is. Finally, snow is here and so is December. Almost everyone's favourite month. Well, it is in my house. And you can feel the excitement in the air. Christmas is around the corner. And this is the good way to welcome the spirit of Christmas. Yea, I am talking about these pancakes. I've made a batch of pancake mix this time to use over this month, Why, you ask. Because, this is not the only pancake post this month. You will see more and more and more!

Here's how I made it.

Pancake mix
Ingredients
6 cups AP flour
1-1/2 tsp. baking soda
1 tbsp salt
3 tbsp sugar
2 tsp baking powder

Mix everything thoroughly and keep in a cool,dark place. Use it within 3 months.

For pancakes
1 cup pancake mix
1 egg
1 cup milk
2 tbsp melted butter
Stick of butter to grease the skillet
Drop of green food colouring

How to
Mix all ingredients in a a bowl.
Heat the skillet and brush with softened butter
Now make pancakes using 1 tbsp, 2 tbsp, 3 tbsp, 1/4 cup, 1/2 cup measures and make pancakes.
Decorate with your favourite toppings.
Enjoy!

I didn't have time but next time, I will make star shaped small pancakes to decorate the tops.


Friday, November 22, 2013

Doodh halwo(Milk Halwa)


This mithai is closer to my heart. Growing up, I saw mom making this mithai whenever milk went sour. She would curdle up the milk further with little bit of yogurt, cook it gently till all the moisture evaporates and voila, super duper halwo was ready. I totally forgot about it in all these years. And God knows why, these past few days, I’ve been craving this mithai like it’s nobody’s business. I NEVER crave desserts, ever. So it was a great deal to me and I know I have got to make it no matter what. At first, I thought of making paneer and go from there. Then I changed my mind, picked up a container of ricotta cheese and made this heavenly dessert! I couldn’t stop eating it. I literally burnt my mouth as I popped in hot halwo right out of the microwave. It was that impatient. Well, craving’s gone. Now that’s good thing.

Here’s how I made it.

Doodh halwo
Ingredients
400 gms ricotta cheese(full fat)
1 to 1-1/4 cup sugar,depending on how sweet you like
2-3 tbsp ghee
4-5 strands of saffron,soaked in 1 tbsp milk
Cardamom powder
Chopped almonds and pistachio nuts for garnish(optional)


How to:
Mix all the ingredients in a microwave safe bowl.
Microwave for about 17 minutes(mine took this long).
Stir at every 2 minutes.
When the moisture evaporates, halwa changes color(caramelization of sugar and saffron effect), it is ready.
Enjoy!

Sunday, November 17, 2013

Personalized Chocolate Cupcakes


I bought this cool machine that bakes individual cup cakes in different floral shapes. It is just perfect for entertaining. Even for a small family like mine, when I don’t want to bake a whole cake, this comes in handy. No waste, no fuss, no heat. Yes, no heat because there is no pre heating of oven is required. So for a big green energy  buff like myself, this is a perfect machine. It was on sale on our last trip to Orlando at one of these stores and I had to grab it. It makes perfect, bite sized cup cakes that I would like to eat myself. Perfectly portioned for me. So here it is, one chocolate cup cake recipe that is my favourite.


Personalized cupcakes
Ingredients
1 cups AP flour
½ tsp baking soda
A pinch of salt
A pinch of baking powder
1/4 cup hot water
½ cup oil
1/4 cup baking cocoa
1 cups sugar
1 eggs
1 tsp vanilla

How to:
In a medium bowl, combine all dry ingredients
In a small bowl, combine all the wet ingredients and mix thoroughly.
Heat up the machine(don’t have one, no worries. Pre heat the oven to 350°F. line the muffin tray with paper liners and proceed as usual.)
Pour the dry ingredients into wet ingredients and on low speed of the hand held mixer, mix for about 2 minutes or until fully blended.
Divide the batter equally into machine cups or muffin cups.
Bake for about 5 minutes in the machine, for about 20 minutes in the oven.
Cool completely on a rack and serve.
Enjoy!
I had this with my favourite latte!

Saturday, November 9, 2013

Nacho Chicken Strips


We all as mothers are very well aware of that 4 PM hunger pang of our kids. As soon as they come back from school, all they want is to eat something. We don’t want them to fill up on snacks as dinner will be ready in 2 hours or so , right? And we want to prepare a quick and satisfying snack for our kids. Well, this recipe fits the  bill. All it takes is a few frozen chicken strips, baked till done. Serve with any kind of dipping sauce and the kids are set.

Here’s how I made it.

Nacho Chicken Strips
Ingredients
6-12 frozen chicken strips(cooked as per directions)
1 cup sour cream
½ cup shredded cheddar cheese
½ cup bottled salsa
Bacon crumbles and more cheese and pickled jalapenos for garnish, totally optional


How to:
Easy, just mix the ingredients for dip and pour over the chicken strips or serve it on a side as a dip.
Enjoy!

Friday, November 1, 2013

Banana Nut Bread


Needless to see, this is by far the most enjoyed bread. Every rookie baker starts their baking lessons by baking this bread! This is such a forgiving bread, even if you srcew up a bit in measurements, you will end up with delectable results.  This recipe can be transformed into muffins as well.  Who doesn’t like to wake up to a freshly baked bread, especially it is loaded with bananas and nuts? All you need is a cup of coffee or a glass of cold milk and a couple of slices of this bread and you are all set for the day.

I like to toast the leftover bread and slather the toasted slices with either butter or jam. Divine!

Here’s how I made it.

Banana Nut Bread
Ingredients
1 egg
½ cup mayonnaise
About 3 mashed bananas
1-1/2 cup flour
1 cup sugar
¾ cup chopped nuts(I used walnuts, use any nuts on hand, or omit nuts altogether.)
1 tsp baking soda
Pinch of salt


 How to:
Preheat oven to 350° F.
Beat egg, mayonnaise and bananas until blended.
Combine remaining ingredients, mix until just moistened.
Transfer to a pre-greased loaf pan.
Bake for about 1 hour or do the toothpick test.
Cool in a pan for about 15 minutes on a wire rack.
Cool completely.
Enjoy!

You could add 1 cup of semi sweet chocolate chips into the batter for that extra special banana bread. Or make glaze out of those chips and just drizzle over the slices.

Fond of Veggies? Add a cup or two of shredded zuccini/carrots to this bread.

Friday, October 25, 2013

Parmesan Crusted Tofu


I used these tofu pieces as an appetizer with the garlic aioli as well as superb sandwich, loaded with lots of stir fried veggies and a couple of slices the tofu. I forgot to take the pictures of that sandwich but I made a tomato and lettuce tofu sandwich later on. That was my take on BLT! my TLT! I don’t think I will be making this again in near future as my family and I are not big on tofu. So,here it is.

Parmesan Crusted Tofu
Ingredients
½ lb. tofu, sliced(about ¼” thick)
½ cup milk
½ cup AP flour
1 cup bread crumbs
¼ cup grated Parmesan cheese
Salt and pepper to taste
1 tsp Italian seasoning
2-3 tbsp oil

How to:


Press the tofu inbetween 2 plates and drain well.
Slice the tofu.
Mix bread crumbs, salt, peppr, seasoning and grated cheese in a plate.
Dredge tofu in the flour.
Dip it in milk.
Now dredge in bread crumb mix.
Pat gently with hands so that the crumbs form nice coating on tofu slices.
Heat oil in a skillet on medium high.
Shallow fry tofu, pressing lightly with a spatula to crisp it up.
Serve with dip of your choice, use it in sandwich or top your salad with it.
Enjoy!

Saturday, October 19, 2013

Breakfast Egg Muffins


I like to have eggs as breakfast on lazy long weekends. I normally sleep in those days as I wake up very early in the mornings to get to work every single day. So I always make an effort not to wake up at least until 7 o’clock on day-offs. At the same time, I want to make something new, something different and something nutritious for my family to wake up to. And yes, it should be done in almost no time. This recipe fits the bill. I made it over one of the summer’s long weekends. My way to find out if my family likes what I give them is this one question: would you like to have it again? Just like most of my dishes, the answer was YES to this dish! Yippee! Another victory.

Here’s how I made it.

Egg Muffins
Ingredients
9 eggs
½ cup milk
Salt and pepper to taste
Chopped green onions
Red bell pepper, diced
Hot Italian Turkey sausage, cooked and crumbled
Spinach leaves
Cheddar cheese, grated (at least 1 cup)
Feta cheese; ½ cup


How to:
Spray 12 muffin cup-tray with nonstick spray, or line with muffin papers.
Sprinkle some chopped green pepper on the bottoms of each cup, then some sausage, and both cheeses and whatever vegetables you’re using. The cups will look more than half full.
Now beat eggs in a large bowl, add milk, salt and pepper. Beat again lightly.
Fill the cups with egg mixture until almost full.
Gently stir each cup with a chopstick and bake at 375° F for about 20 minutes.
Serve with your favorite berries and toasts.
Enjoy!

The beauty of these muffin cups is that they refrigerate well. You can put the leftovers in a zip lock bag and refrigerate and grab one when you are ready to hit the road on weekday mornings. Just microwave for a few seconds and they will be good as freshly made. A good way to feed your family healthy ‘stuff’, isn’t it?

Saturday, October 12, 2013

No Carb Spaghetti


Surprised?! Don’t be. This is just a vegetable that miraculously transforms into these beautiful threads that resembles to angel hair pasta and thus, is called Spaghetti Squash.  I wanted to try it myself as I have heard others raving about this absolutely gorgeous, no fuss, no starch pasta dish that comes from a squash. Now I am a believer. It does resemble spaghetti(or angel hair) and is so delicious and nutritious at the same time. Too bad, can’t say the same about pasta!  I only added salt, pepper and lots of extra virgin olive oil with Parmesan shavings in my pasta. You can whatever vegetable that suits you and even soak it in your best marinara sauce. Top if off with meatballs. Your squash, your dish, your whim!


Truly, no recipe requires. For those who know me, this is one of my kind dishes. So, cut the spaghetti squash in half, oil inside and outside well, sprinkle with salt and pepper and throw in 450° F hot oven for about an hour or until the vegetable is soft.

Let it cool down a bit so that you can handle it and grab a fork, start shredding it! That’s it. There’s your spaghetti. Toss it in salt, freshly cracked pepper, shavings or grated Parmesan cheese and extra virgin Olive oil and serve.

Enjoy!

Sunday, October 6, 2013

Mediterranean Pizza


Remember my grilled chicken and veggies, Mediterranean way? Well, I call this pizza Mediterranean as all the leftovers from that grill landed on this pie! It’s that simple. Pile up any veggies with lean protein on a pizza crust and even the pickiest eater would gobble it up. Pizza is the best way to get your kids eat their vegetables! No kidding. So this is just the basic idea. Make your pizza dough and bake your own pizza with whatever you have on hand or whatever you would like to eat. I bet you won’t pick up that phone to order delivery!

Basic Pizza Dough

1 pkg. dry yeast
3/4 c. warm water
1/4 tsp. salt
1 T. oil
1 tsp. sugar
3 c. flour

Mix ingredients together, adding flour last. Cover and let rise 1 hr.
Now, spoon your favourite pizza sauce on top, pile up all the leftover chicken and veggies and top off with loads of shredded mozzarella and cubed feta cheeses.
Bake in a very hot oven till the crust is golden brown and cheeses are melted.
Enjoy!

Saturday, September 28, 2013

Grilled Chicken and Vegetables


 I wanted to go Mediterranean with this grilling. So I chose chicken, peppers, potatoes and feta. Of course with lots of Greek Oregano.  The beauty of Mediterranean cuisine is that it is very simple and yet very very delicious. You don’t have to labour over the hot stove for hours, no need to gather lots of spices and herbs. Just a few simple ingredients, a few simple steps and voila, dinner is served!

Join me at my table today for this flavourful Mediterranean meal.

Here’s how I made it.

Grilled Chicken and Vegetables
Ingredients
1 lb. bonelss, skinless chicken breasts, cubed
2-3 tbsp freshly squeezed lemon juice
Salt and pepper to taste
¼ cup olive oil
2 tbsp oregano, crushed between your palms to release the flavour
1 each red, orange and yellow pepper, medium sized, cubed
3 russet potatoes, washed and thinly sliced


How to
Marinate peppers and potatoes separately using oil, salt,pepper and oregano for about an hour.
Marinate chicken as well. Overnight is the best.
Preheat the grill.
Skewer chicken or just leave the cubes as it is and grill chicken and peppers and potatoes until vegetables are tender and chicken is cooked through.
Arrange on a serving platter and garnish with chopped parsley(optional) and feta cheese crumbles and serve.
Enjoy!

Saturday, September 21, 2013

Macaroni N Cheese


Now I am talking, right?! This is a classic comfort food adored by all ages. Kids love plain mac n cheese. Adults go for more sophisticated version of mac n cheese with all kinds of add ins and toppings. Again, possibilities are endless for add-ins and toppings. This time around, I just kept it simple with a few slices of bacon as an add-in and bread crumbs for topping. No need of anything actually. Just keep it plain as the kids would eat and you will have a satisfying meal.

Here’s how I made it.

Macaroni N Cheese
Ingredients
2 cups cooked Macaroni (or any other small pasta)
1 cup milk
1 cup each shredded cheddar cheese, provolene cheese
¼ cup Parmesan cheese
2 tbsp flour
3-4 tbsp butter
Salt and pepper to taste
Garlic powder to taste
A few bacon slices, crumbled
1 cup Panko bread crumbs
1 tbsp Italian seasnonings
2 tbsp oil
 

How to:
Heat butter in a saute pan.
Add flour and cook for about 5 minutes on medium heat till raw smell is gone.
Add milk and bring to boil on medium heat.
Now add pasta, all the cheeses,bacon(if using), salt, pepper and garlic powder.
Mix thoroughly.
Transfer into a heat proof casserole.
Mix bread crumbs, oil and Italian seasonings.
Top pasta with moist bread crumbs.
Broil till topping is nice golden brown.
Serve.
Enjoy!

Saturday, September 14, 2013

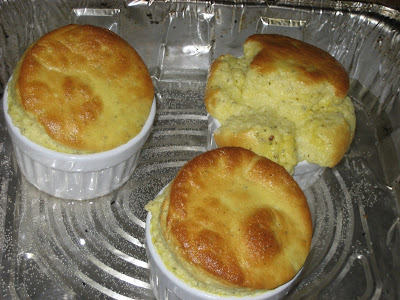
Breakfast Soufflé


 Now this is the easiets soufflé ever. Those lazy Saturday mornings, when you are cosy and comfortable in bed, don’t feel like getting out of it soon and still want to make an over the top breakfast for your family that everyone can love to come to table for, this is it!  Only a handful of ingredients thrown to gether and baked beautifully in a risen, warm goody, you would for sure rise to the occasion just as your soufflé. And the best part is this soufflé won’t fall down once out of the oven. It does hold the shape which is a delight to look at.

Now soufflé is lightly baked cake, with cream and egg yolks and beaten egg whites. We are omitting all those creams and little bit of flour and just stick with eggs and cheese. After all, it’s breakfast. Lunch will be on the cards so you don’t want to fill up right in the morning.

Here’s how I made it.

Breakfast soufflé
Ingredients
3 eggs, separated
4 oz. Philadelphia cream cheese
¼ cup grated cheddar cheese
Salt and pepper to taste
1 tsp onion powder


How to:
HEAT oven to 375ºF.
BEAT egg whites in medium bowl with mixer on high speed until stiff peaks form.
Beat cream cheese with salt, pepper and onion powder in a  large bowl with mixer until creamy.
Add egg yolks; beat until well blended.
Now add grated cheddar.
Gently stir in egg whites until well blended.
POUR into 3 ramekins sprayed with cooking spray.
BAKE 24 to 26 min. or until top is puffed and golden brown.
Do Not Open the Oven Door until fully fluffed or your soufflé will be crashed to the bottom of the ramekins!

The only downside of this soufflé is that it doesn’t reheat well. So you can’t make more and stash them in the refrigerator.

Enjoy!

Sunday, September 8, 2013

Milk Fudge(Milk Burfi)


I have never had a sweet tooth, to begin with. Growing up, I only like to have doodhpaak(Gujarati version of Kheer), koprapaak(coconut fudge) and gulab jamuns(need I say more about this dessert?!). And that too, occasionaly. After having moved to Canada upon my marriage, I had to start making desserts in my kitchen as hubby has a sweet tooth no one can beat. He has to have something sweet every day after dinner. And yes, he is a sucker for Indian mithais. Chocolates and cakes would only do when there is absolutely no mithai available in my fridge or pantry. So I began to experiment with the recipes for desserts about 18 years ago and now I can proudly say that I can make great mithais. I still stick to make mithais without or less ghee. That’s why I like to make mithais with milk and paneer. Gujarati mithais like magas, mohanthaal- require lots of ghee. So that is once a year kind of dessert.

In India, we normally get mawa burfi. Mawa(khoya) is abundunt in India. When I came to Canada about 20 years ago, there were only a handful of Indian grocery stores around. No mention of mawa. Nowadays, there is an Indian grocery store in every street corner or at least it seems like it, mawa is readily available but very very expensive. It takes time and effort to make mawa at home so I started using ricotta cheese for mithais. And the results were mind blowing. So even today, I stick to using ricotta cheese instead of mawa.

Milk Burfi(Milk Fudge)
Ingredients
1 container (400 gms.) Ricotta cheese(full fat)
Same container ful sugar
½ container ful milk powder
1 stick butter
Cardamom powder
Chopped almond and pistachionuts for garnish
 

How to:
In a microwave safe bowl, combine all the ingredients and cook on high heat for about 15 minutes, stirring occasionaly.
When the mixture is thick and moves around the spoon while stirring, it’s ready.
Pour in a non stick tray, sprinkle garnish.
Cut into pieces when cool down.
 Enjoy!